A Professional’s Guide to Specifying and Installing BS Standard Wall Switches & Sockets
This professional guide breaks down how to correctly specify and install BS wall switches and sockets. From pre-installation planning and back-box selection to wiring techniques, mounting accuracy, and final testing, the article explains every critical step with clarity. It also highlights how engineering features—such as reinforced steel frames, spacious wiring structures, and advanced terminal designs—significantly enhance job efficiency, safety, and long-term reliability.
Beyond the Basics: A Professional’s Guide to Specifying and Installing BS Standard Wiring Accessories
For electrical wholesalers and project contractors, the quality of a wall switch or socket isn't just in its aesthetics—it's in its installation. An efficient, secure, and straightforward installation process directly translates to lower labor costs, faster project completion, and fewer callbacks. This guide moves beyond a simple "how-to" and provides a professional overview of the best practices for installing BS 1363 standard wiring devices, highlighting how design features, like those found in the LIBAIK series, can significantly enhance both the process and the outcome.
Phase 1: Pre-Installation Planning & Specification
A flawless installation begins long before a single wire is connected.
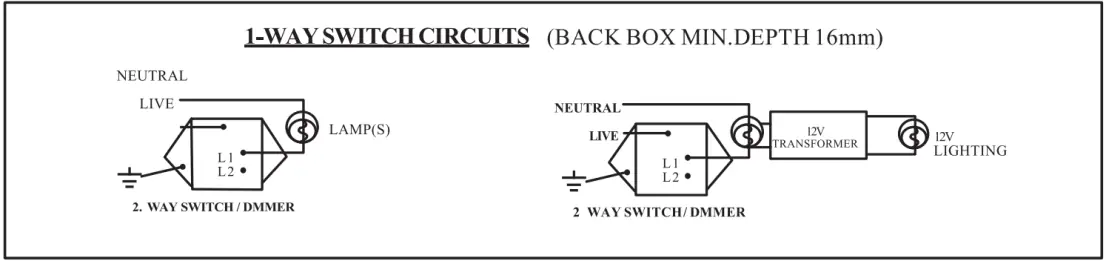
Confirming Back Box Compatibility: Ensure the specified back boxes (mounting boxes) have the correct depth to accommodate the chosen device, especially for modules with deeper profiles like USB chargers or dimmers. All LIBAIK series (V6, V7, V12, L11) are designed for standard BS back boxes.
Verifying Circuit Load & Wire Gauge: Match the device's rating (e.g., 13A for sockets, 10A/16A for switches) with the circuit's protective device (MCB) and wire gauge. Pro-Tip: For circuits with multiple sockets, using ring final circuits is a common practice in BS-compliant installations.
Choosing the Right Series for the Job:
- l For speed and efficiency in large projects: The LIBAIK L11 feature large, easily accessible terminals, making them a favorite among electricians.
- l For a premium, seamless finish: The LIBAIK V7 series' two-part design (mounting grid + screwless faceplate) allows the back-end wiring to be completed and tested before the final decorative plate is snapped on, protecting it from damage during construction.
Phase 2: The Installation Process - Where Quality Engineering Matters
This is where the design of the wiring device itself plays a critical role.

1.Secure Mounting Frame Installation:
The foundation of a solid installation is a non-warping mounting frame. LIBAIK's V6 and V12 series feature a 1.5mm reinforced steel frame that resists bending, ensuring the device remains perfectly flat against the wall, even on uneven surfaces.
2. Efficient & Secure Wire Termination:
- l Terminal Design: High-quality terminals, like the nickel-plated alloy terminals on our V12 and L11 series, provide superior corrosion resistance and a strong clamping force on wires.
- l Wiring Space: A well-designed chassis with ample wiring space, a key feature of our V6 series, prevents strain on conductors and makes connecting thicker wires significantly easier and faster for electricians.
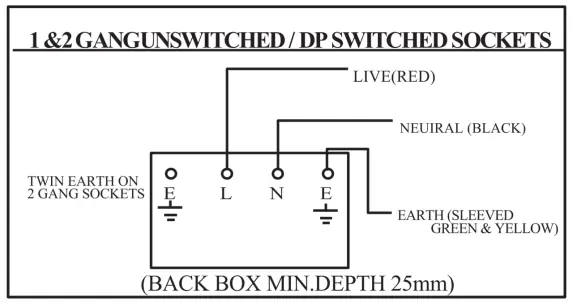
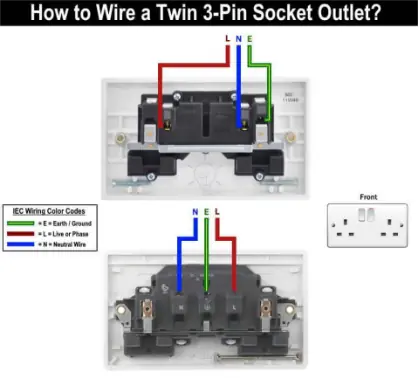
- l BS 1363 Wiring Standard: Always adhere to the correct color code: Brown for Live (L), Blue for Neutral (N), and Green/Yellow for Earth (E).
3.Device Mounting & Faceplate Attachment:
- l The device should be securely fastened to the back box.
- l For screwless models like the V12/V7/V6 series: The faceplate should click into place with a firm, satisfying snap, with no gaps or loose edges. This simple final step saves valuable time on site compared to traditional screwed plates.
Phase 3: Post-Installation Testing & Commissioning
A professional installation is not complete without rigorous testing.
- l Mechanical Checks: Ensure all switches have a positive, crisp action and that sockets have a firm grip on a plug.
- l Electrical Testing (by a qualified professional): This includes continuity tests, polarity checks, and insulation resistance tests to ensure the circuit is safe and compliant with regulations.
Specifying and installing wall switches and sockets is a critical process where product design directly impacts project efficiency, safety, and final quality. By engineering our products with features like reinforced steel frames, spacious terminals, and intelligent two-part designs, LIBAIK empowers contractors and wholesalers to deliver superior results with greater confidence.